HOLIDAY GIFTS


Fun and Thoughtful Christmas Gifts A DIY Special

It's nearing the week of Christmas and if you have yet to get all those friends something unique, then here's a fun list of artistic DIY crafts that won't take too long!

1. Ribbon Christmas Tree

Ribbon Christmas Trees - ThreeI thought this was such a cute idea. Pine trees are my favorite trees next to weeping willows because of this unique triangular shape and their fresh smell! Follow this tutorial for making cute ribbon pine trees that would make an excellent stocking-stuffer and decoration for your friend's home! 
One thing that I would change,is that I would use a Styrofoam cone with a more dramatic angle, and wrap it around the top to create more of a point and have one pin at the very top to secure it, instead of having a flat and gross ribbon mess at the top of the tree! 


2. Paper Ornaments         

Lia Griffith - Paper Bow Ornaments
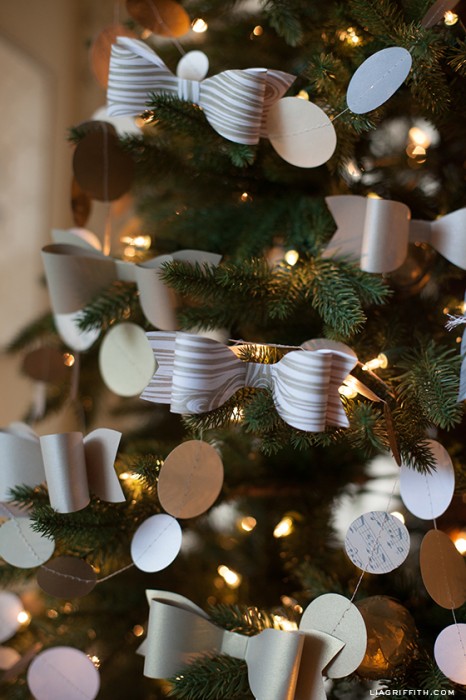
Time to pull out your scrap booking paper and scissors! This link will send you to a list of DIY paper ornaments! Personally, the bow (shown in picture to the right) and the ornate snowflakes are my favorite! I can't get over how cute these are, and I can't wait to make them myself! 


3. Mason Jar Gift 

Mason jars have been the craze of the year, it seems. I've never been much into fads, as they disband quickly and are usually pointless, but I have to admit that mason Jars are simply the cutest! And they make perfect gifts! Whether you want a random assortment (fill your jar with candy, nail polish, jewelry, gift cards, etc.), or want to have a holiday flare up, it's up to you! Click this link to find out how to create a mason jar snow globe! 


4. Christmas Gnomes    

How to Make a GnomeThis is hands down the cutest Christmas decoration I have ever seen. I don't know what makes these gnomes so cute, but they have my attention! This tutorial is probably the trickiest one to create, but I sure do think it's worth it! Just look at the little guys! They'd make the cutest stocking stuffers! 


***DISCLAIMER***
No photos on this blog post belong to me. They belong to the corresponding links within the descriptions.

Word Count: 372


IMPROVMENT

IMPROVING YOUR ART Some Tips on How to Progress in Your Art

One of the greatest ways to get confidence in your artistic style is to look back at your old sketchbooks and note how much you've improved. 

How To Improve


  • Improving on art can be difficult, but it really just takes dedication and practice. 
  • You should try to draw or doodle every day.
  •  Always carry a sketch book around with you as you and a few drawing tools (pencil, pen, marker, ink, charcoal).
  •  Never be afraid to pull out your phone and take pictures of things that expire you. 
  • Always keep a positive attitude about your art.
  • Never let terrible criticism bring you down. Try to do the "boring" exercises, even if you don't want to. 
  • Keep your art organized
  • Take classes for art
  • Watch tutorials
  • Look at other people's art work
  • Always try different mediums
  • Use a model or reference when you draw
  • Keep an art blog (post your art, post other people's art (with credit to original artist!!!)
You may not have to do all of these, but doing all of these helped me improve to where I am now. I always try to take art classes inside school and during the summer in different art programs. These are immensely helpful and I love to go to them. 


CHARACTERS DESIGNS

Developing Characters & Making Them Diverse

Developing diverse characters can be increasingly difficult for some. Have you ever drawn a few original characters and after you put them side by side and realized that you've drawn different characters that look the same? We've all been there. But how do you stop it? What do you focus on? Here's an easy way to remember the most important points:
Shape
Lines
Open
Position
Expression

SLOPE


Shape

© Ryann Jensen
© Ryann Jensen
Each character you have should have a different base shape. My example to the left has circular shapes to her figure. Maybe another one of your characters uses squarish shapes, or triangular. Some characters may be made of squares and rectangles, depending on their features. Sketch out shapes and try to figure out what works best for the character you're wanting to design.

© Ryann Jensen
© Ryann Jensen

Lines

Lines define your character. Do you ever draw a character and think "this doesn't look right?" Your lines probably need to be changed. Lines go right along with shapes. I mean, they make up shapes, so that's obvious! but when you lay out your shapes, you'll have to change them to be more anatomically correct.  Lines define what you're character is doing, thinking, their expression, their form, their everything. Think carefully about your lines. Don't just throw them on a page when you're developing a character.


Open (Minded)

© Ryann Jensen
© Ryann Jensen
You might not know this, but having an all-white group of characters is boring. Not everyone on this planet is white. In fact, there are more people of color than there are white people. So all of your characters shouldn't be white. Not all of your characters should be physically fit. People of color, disabled, different genders, different sexuality, etc., they are all existing in this world today. Include them. 


© Ryann Jensen
© Ryann Jensen

Position

Setting your character in different poses or placing them in different situations can be an easy and fun way to build character. Draw their whole body in different poses. If a pose doesn't fit your character, move on. If it does, keep it! Use it as a reference. Add other characters to the scene. Maybe you'll be able to develop more than one character at a time!


Expression

© Ryann Jensen
© Ryann Jensen


Word Count: 452
Here's a hint to expression: don't be afraid of wrinkles! Placement of wrinkles can change the expression of a character without making them look "old." Eyebrows hold the most emotion in expression, and the eyes are a focal point. They go hand and hand. You also have the mouth, which can be twisted and turned. Have your character bare their teeth, or chew at a pencil. Let your creativity flow with expression!


MUSIC

LISTENING TO MUSIC While You Draw

Everyone listens to music, especially when they find themselves doing something boring (homework, studying, cleaning, etc.) or contrasting to something exciting (driving, hanging with friends, work, etc.). I listen to music whenever I can, but I've realized that when I listen to music the most, it's when I draw. I've also found that the music I listen to sets my mood for my drawing. So I've recently come up with an easy exercise for sketching, character development, and/or inspiration! 

A Sketch a Song

Turn on a radio or even put your iPod/iTunes to shuffle, grab a pencil, and a sketch book! When a song plays, draw what you picture in your head. Maybe it's a pop culture character, the artist of the song, your own character, or scenery. Whatever it is, draw it. If multiple things pop up in your head, sketch all of them! If a song has no emotion for you, or nothing pops into your head, go to the next song. Here's the catch: When a new song plays, start a new sketch. When you're done with sketching as many songs as you want, go back through your sketches and see which ones you like the most. Take them and evolve them: bring them to life. Give them color. Use it as your rough draft for your final piece. 
The purpose of this exercise is to get your sketching pace to match the speed of your thoughts: something that's quite tricky to do some times! Like figure drawing, try to get the mood you feel in the time span of one song. Getting ideas down quickly can be tricky at first, but the more you practice, the better you will get. I promise! This could be helpful for those who plan on going into the animation business, concept designs, story boarding, or illustration.  

Music I Listen To

My music taste has always been scattered. I listen to a bit of everything, honestly. I'm currently listening to Classical when I'm drawing. Sometimes it's just plain ol' Classical; sometimes I look for contemporary or modern classical. Whatever fits my mood, I listen to. If you asked about three months ago, I'd be listening to music from Broadway. I find those songs very inspirational when I want to think of character development or the mood of a certain scene. Years ago I was into songwriter, indie, or alternative music. Something has always stayed the same though: Music has always been there to inspire my art. 
Word Count: 421

PAINT BRUSHES

Brushes, Brushes, and More Brushes! Do's and Don'ts for Beginners


Usually when you walk into the Michael's art and craft store you see the long isle of brushes that are labeled "BEGINNERS" and are leveled all the way up to "PROFESSIONAL". Beginner brushes in that isle may not be cheap, but then you look at the professional brushes and go "Wow, okay, those are cheap!" But why are they so expensive for Beginners? It's because they're intended to be used the wrong way. Beginners don't always know how to care for their brushes, and so they are expensive enough to be labeled as "quality brushes", but cheap enough to where as they can easily be replaced. So for the beginners out there, how do you know what Beginner brushes to use?

The Brushes NOT to Get

Two words: Artist's Loft. It doesn't matter how cheap you think they are, or how well you think they look, please do not waste a single dime on Artist's Loft brushes. Their paint palettes, canvases, pencils, and easels are okay, but do not, and I beg you, do NOT get Artist Loft paints or brushes. You will waste money. And I stress again, yes they are cheap, but they are not worth it. They're paints aren't thick and they don't last long. These paints are paints you can buy for children, not for beginners who are looking to sell and make exhibits in the future. Their brushes are by far the worst I have come across. After the first few uses the bristles begin to fall out, and when you wash the larger All Purpose Brown Synthetics Brushes they take forever to dry (I tried it by towel first, then left it over night, went shopping with friends, and was home by four, and they were still damp), and they had a musty and moldy smell to them when they finally dried (after two days in front of a fan). 

Brushes that are packaged with a cardboard back and plastic cover such as these (packaging example) should be added to the list of don'ts! I don't know why, but whenever brushes are packaged this way, I have had no luck with them. I see that they are more expensive, so i assume they're okay quality, but I have now realized that they are that expensive because of the way they are packaged.
So what brushes should you buy?

The Brushes TO Get

If you're looking for multiple brushes packaged together, go for a brand that isn't Artist's Loft (seriously, anything but Artist's Loft) that is packaged in a plastic package like so (packaging example). I have no clue why I find these better than the cardboard-back packages, but it's just my opinion. A great Beginner's brand is the Liquitex BASICS brand. Seriously, bother their brushes and paints are great for beginners. I highly recommend them. Now, if it's just after Christmas or your birthday and you have cash to spend, go to that long isle of brushes sold individually in Michael's. They are expensive, but that's because they are some of the best quality brands that you will ever find. 

Brush Tips

  1. If you order brush sets online that are from high-quality brands (Winsor & Newton, Loew Cornell, Grumbacher, etc.), buy specific brushes (watercolor, acrylic, oil, etc.) 
  2. High quality brushes are well paid for. Try your best to not damage them. I've had my Winsor & Newton watercolor brushes for over two years now, and they cost me over $50 for a set of five, and I take care of those brushes as if they were newborn children. 
  3. Use the correct paint on the correct brush. You can damage watercolor brushes if they are used with acrylics or oils, etc. They are labeled as a specific media use for a reason. Listen to the package. 
Hope this saved many of you Beginners from loss of money, and money well spent! Happy painting!

Word Count: 661

ART IN SOCIETY

How Important Is Art in Society & Has it Always Been Important?

Is art important to our society? To cultures world wide? Yes, of course it is! Almost everything around you to some extent is because of art. The house you live in is architecture, it's designed (drawn) by an architect. The television you watch, every thing that is broadcast to you like commercials, shows, movies, are all films, which is actually a type of art. The clothes on your body are sewn. Yep, fabrics is art. Life without art would be... well... I don't suppose everyone knows. For years, decades, and centuries humans have been driven to art is some shape or form.

So Has it Always Been Important?

Ever since prehistoric times humans have been creating art. Making small statues of themselves out of the dirt and clay in the earth, drawing with a stick in clay. Then before the common era (BCE or BC) humans began creating cuneiform, pictorial writing with a stylus in clay. Going into more complex into the Egyptian hieroglyphs, and evolving into the Greek alphabet, our inspiration for our own alphabet now. Without art we would not have a functional language, or languages that could be converted to other languages for things like trade or exchanges. 

Without art, history wouldn't have been documented. When events happened, instead of writing the events down, they drew or weaved or sculpted them. As beliefs turned into religions, they began to draw pictures or carve them onto stone walls. Because it was engraved in material that didn't decay, or didn't decay much, centuries later they still stood. Its where we get our stories, how we keep our religions, inspiration for books and movies, etc. 

So yes, art has always remained important. Your life revolves around the art that still stands, the art that will be, and the art that has yet to be discovered.
Word Count: 318

GETTING YOUR OWN STYLE

Ways to Create Your Own Style With Artists You Love!

We all reach a time in our artistic careers where we just aren't happy with our art style. Whether that's because it's too much of your old techniques, you're somewhat-copying a fellow artist, or you're just plain bored of it, doesn't matter! You're looking for a change. Here is a technique I use whenever I hit this wall:

Artistic Frankenstein Monster!

Before I dive deeper in to this process, I need to strongly stress a few things, and I'll just simply list them below, they're self explanatory

  1. Do NOT ever copy someone's artistic style- it's THEIRS, not yours. Referencing is a-okay. 
  2. Keep in mind that style is a perception of realism- just keep that in mind!
  3. Anatomy is pretty key in stylistic drawing- you need to know your realism before you can stylize it.
Alright, with that out of the way, we can begin. As you can see from the subtitle, we're going to kind of reproduce Frankenstein's Monster (not really, sorry monster nerds!).  So here's some step by step instructions.

  1. Find some artists you like and pick your favorite aspect of their art (at least three examples) and put it all together so look at! I put something like this together below for you to understand what I mean. All together I love how Lily Williams draws eyes, how Phillip Light draws hair, Brittany Myers' figures, and Sanne's coloring. 
  2. Now start putting your favorite aspects together! Below is what I have for line art. What I love about Lily William's eyes are the use of thick lines and a single colored iris. Phillip Light's hair had a lot of simplicity and curvy dynamics to it, and you can't see it in the cropped photo below, but my character has curves and angles just like Brittany Myers' figures. I've also kept my own style to dominate the other styles: the nose, lips, and face shape have always been my favorite things to draw, no matter how difficult. I try to exaggerate those specific features to shape my own individual style. Do you see how using other's styles to reference off can shape the way your style develops? Next I'll be laying down some colors. 
  3. Keep going! As you can see I've colored the line art and blocked in my colors. I've also started the shading on the shirt. Sanne seems to use lots of layers, as her colors are lifeless and basically blocks of colors. I don't want this tutorial to progress into a how I create my digital paintings, so I'm going to continue pointing out aspects that I've carried on from other artists, and techniques I've kept myself.
  4. From this point on I'll just show you the pictures of the progress i go though to create the final picture. Thanks for viewing and I hope it was of some help!


Word Count: 477

TIPS ON SKETCH BOOKS

Tips on How to Manage Your Sketchbook

Here's a simple list of how to manage your sketchbook for art!

  1. Keep multiple sketchbooks, but only one for each "category" (don't use your travel sketchbook at home, don't use your watercolor sketchbook for graphite sketches, etc.)
  2. Take at least one sketchbook with your wherever you go (out to dinner, a walk in the park, to a friends house, etc)
  3. Remember that inspiration is everywhere. 
  4. Sketch your ideas for projects in your sketchbook (every artist should get used to thumbnail sketches!! I usually fit 6-8 thumbnail sketches to a page in my sketchbook, but I keep the proportions the same! Ex: 2''x4'' thumbnail, 6''x8'' final product)
  5. Use every inch of your sketchbook- color the cover, write on the cardboard in white color pencil, etc.
  6. Be open minded. Don't just draw figures. Draw what you see. Practice different techniques. Different basics.
  7. WRITE NOTES!!!! I cannot stress this enough! Don't just DRAW or PAINT in your sketchbook. Jot down notes if ideas are coming all at once. Character names, places, people to meet, etc. 
  8. Every artist needs at least one sketchbook. AND KEEP YOUR SKETCHBOOKS! It's amazing to be able to look back 10 years to see your progress.
Word Count: 205

ART BLOCK

How to Overcome Art Block

All artists have had that moment of frustration we call art block. It's probably more annoying than ruined paint brushes (learn how to take care of your paint brushes here!), and we've all come across it at least a few-hundred times in out life, right? Here are some tips to push through art block!

  1. Find inspiration. Whether you decided to take a trip to your local museum, or simply look some art up online, inspiration is every where! You'll never know what you'll find.
  2. Change up your mediums. If you're a pencil and paper, go to pen and ink. If you prefer watercolor, try oil pastels! You're not entitled to stick with the same boring medium every day, and seeing the same materials can actually aid to your art block. So change it up!
  3. Sign up for classes. Signing up for classes with an instructor may sound boring and constricting, but if you're being taught what to draw, it can open knew ideas you can write down or sketch out. 
  4. Scribble, make shapes, get frustrated! Anger and frustration are emotions, and can inspire you in the strangest ways. Show your frustration on the canvas, splash paint onto the canvas, smear colors everywhere. You can't go wrong with a little bit of abstract. You may just find inspiration within it.
  5. Listen to Music. Music helps simulate the brain, and creative flow may come easier to you. Illustrate a song or even part of the lyrics. 
  6. Don't think about whether it'll sell. This leads to stress, and that's not something you want! Draw from your inspirations. 
  7. Find a photo album. Maybe one on your phone, or a family collection, find pictures and draw the picture. Recreate it. Make the subjects wear funny hats, change the colors, etc. 

Also remember that an art block isn't that you stop progressing. You get better with every drawing or painting you create. When you have an art block, you feel as if you are no longer progressing or that everything you create isn't good enough. It's not your style that has been changed, or that you're not a good artist anymore, but your perception of art has changed quickly in a short amount of time. This shows that you are more critical of yourself, and that you're becoming a better artist. You're identifying your mistakes, you're growing as an artist. The most important thing to do is find a source of inspiration and use it for a reference.
Word Count: 419

TAKING CARE OF YOUR BRUSHES

How to Take Care of Your Paint Brushes


One of my greatest pet peeves as an artist is seeing ruined paint brushes. I work with water colors and acrylics for my main medium, and a broken/ruined brush is one of the most devastating experiences.  Below are the dos and don'ts of proper brush care! 

Brush Anatomy

The Anatomy Of A Paint Brush
Photo from Learning To Paint

Don'ts 

  • Never set the brush bristle-down in a water glass... or any glass. Not even for a few minutes. This will ruin your bristles by bending them, and this isn't something you can fix. If you have a stiff brush where the bristles don't bend, it's not an exception!! The water will spread the brushes and the brush will dry frayed. 
      • If you're on a small budget, simply lay your brush on your table with the bristles hanging over the edge of the table. If you're able to though, I strongly suggest getting a brush rack. You can find these cheap almost anywhere. 
    • Don't let acrylic dry on your brush. I cannot stress this enough. The acrylic will NOT come off, no matter how hard you try or how long you soak it. 
        • If you're painting with acrylics and you need to use more than one paint brush at a time, set your brush CAREFULLY on a paper towel and spray the brush with a water bottle, which you should do to your acrylic paints anyway. This will keep it from drying out as you use a different brush.
    • Try your best to not get paint on the ferrule. This isn't the most important "don't" but it can lead the bristle to fray where they connect to the ferrule. 
        • Note that even if you wash the brush, the paint can get stuck under the ferrule. Simply try your best to keep your ferrule clean!
    • Don't clean your brush with warm/hot water! It causes the glue under the ferrule to become weak, allowing the bristles to fall out- not something you want!
        • Cold water is the way to go!

    Dos

    • Squeeze off paint with a towel 
        • Make sure to be careful, Don't do this too fast, you could bend the bristles. The main thing is to get rid of the excess paint.
    • When rinsing the brush use your fingers to gently squeeze out the paint
        • You can use brush soap, or regular hand soap. You can buy cheap brush soap here.
    • Store your brushes where the bristles to no touch, and where the bristles can either stand up straight or lay down flat. 
        • Easiest way to do this is to either but brushes in a roomy jar (bristles up!) or to buy a brush box/holder.
    Happy Painting!
    Word Count: 446

    FLEXIBILITY IN YOUR ART

    10/9/14

    An Important Note on Flexibility

    One of the toughest things for me, personally, is being able to relax and to have relaxing strokes with my pencil or brush. From the earliest age teachers and mentors have been telling us to draw inside the lines, draw exactly what you see, erase your mistakes! I feel as if this limits the flow of creativity and relaxation in art students. It usually isn't until high school where students are able to relax their shoulders, sit back, and draw from a flexible wrist. So to all of you young readers (and older!), here are some tips to having a more flexible core. 


    •  Relax, Lean Back, and Loosen Your Grip
      • I don't think I can stress enough how important this step is. If you're hunched over your paper, it creates tension between the eyes and motion of your pencil/brush. 
      • Simply take a deep breath and just relax. Lean back in your chair, lazily look down at your paper. 
    • Two Ways to Hold your Pencil 
      • You can hold it the tradition "Tripod" grip
      • Or hold the pencil in a "Overhand" grip, more common among artists.
      • I recommend the "Overhand" grip for flexible drawings and gestures
      • drawing tripod grip
        Photo from Proko
        drawing overhand grip
        Photo from Proko
    • Figure Out What You're Drawing From
      • Are you using your imagination?
      • Have a specific subject in mind (human, animal, etc.)? 
        • If so, use a reference! It's not copying, it's simply helping you to gain muscle memory. Print the reference out, draw over it. Help it teach you where your strokes go.
      • Even if you're drawing from imagination, inspiration and references can aid you!
    • Use Long and Fast Strokes
      • If you become too focused on one point of your drawing, you're missing the entire point. Be fast and consistent. 
    • Try to Start With Figure Drawing
      • Whether from a live model or a drawing, figures contain movement, and a lot of it. Below is a link to a website that will send you to a website for figure drawing. 
    • Or You Can Simply Practice Line Movement
      • Draw lines, circles, anything you want to get used to the relaxed state. 
    • Keep Your Lines Loose and Light
      • Don't press down too hard on the tip of your pencil, you might not get the flowing form you need. 
    • Just Stay Relaxed
      • Make sure you keep relaxed, especially your wrist. 
    PLEASE REMEMBER: Drawing like this (in a flexible manner) is usually used for sketching and outlining ideas quickly. When you have your lines laid out, you can then concentrate on specific spots. 

    FIGURE AND GESTURE DRAWING:

    HOW TO BE TALENTED AT ART

    9/30/14

    How to Gain Talent-If You Don't Already Have It Hint: You Do

    You hear it all the time: 'Practice makes perfect!' 'You'll only get better unless you practice!' 'You'll be a pro once you start practicing!' It doesn't matter who you are, what you're trying to accomplish, it's true, plain and simple! If you want to get better at art, you really need to work for it. Personally, one of the most insulting "compliments" (yep, compliments can be insulting, believe it or not!) is someone telling me- often in front of other students and/or artists- "You have a natural talent for this!" You're probably thinking that it's weird to insulted by this, but I'll tell you why:
    1. I didn't become an "amazing" artist over night. It took years of practice and effort.
    2. I'm aspiring, I haven't reached my full potential, and I never will.
    3. It's insulting to those around both you and me.
    Days, months, and years were spent up to where I am currently at my art. By no means am I perfect, by no means have I reached my full potential. Frankly I never will, because there is always room to grow. Leonardo di Vinci spent 'til the end of his days studying and becoming a better artist. After all, Picasso's famous words continue to ring through

    "It took me four years to paint like Raphael, but a lifetime to paint like a child."

    Of course, some people may disagree with him. Some people may think that he is the worst painter to live. And some people may think about that when they see your art. I'm going to tell you something, and I'm going to say it to you in caps, bold, and italics so you get it: THOSE PEOPLE DON'T MATTER.  The only thing that matters is that you created it, and what you did was intentional. Of course, just like Bob Ross says, happy little accidents always happen! But those happy accidents (not mistakes!) can be incorporated in the most beautiful way. And when someone who is thought to have "less" talent than me, and a fellow student or even teacher points it out, it not only makes me self conscious, but terrible that the different talents of everyone around me are being thought of as less. It truly is insulting, and this mindset needs to cease! This is exactly why I'm writing this entry.
    So, how exactly do you "receive" talent?

    You're Born With It

    I don't mean you're born with the actual "talent". Because if that was true, Mozart and Beethoven would have jumped into the world playing the piano and composed pieces by the age of one, and of course that's simply not plausible. When I say you were born with it, I mean you were born with the drive for it. The passion for it. Without the passion, you don't try it, or you don't try to do well. If you're passionate about it, then you do it a lot, possibly even constantly. What happens when we practice something constantly? We get better at it. 

    You Practice

    Some people aren't born with the passion. Wether it takes their whole life to want to learn, or it's just a side hobby that doesn't matter to them, they end up practicing some form of art. For example, my great-grandfather has a small hobby for wood carving that he started after retirement. While he's only been doing it for about 20 years (give or take a few), it was never a passion for him while he was younger. When he started it, he wasn't perfect, but he practiced. Have you seen a pattern here? I think so. 

    Practice Does Make Perfect

    If you want art as a hobby or as a career, or it's just simply a passion you partake in whenever there is free time, you practice. Every human as the same talent: practice. So when someone says "Have you seen such and such's work? They're so talented!" What they're really saying is "Have you seen such and such's work? They've practiced so much!" It really all goes hand-in-hand.
    Word Count: 689


    AN INTRO TO ART

    You Are an Artist!

    The first question you'll need to ask yourself is "what is art?" I know it seems like a silly question, but it is absolutely necessary to eliminate self-doubt and reassure yourself that there is no right or wrong way to create! Small exercises can also help with reassuring yourself for creating a style and/or method for your own personal taste. 

    The dictionary term for art is "the expression or application of human creative skill and imagination, typically in a visual form such as painting or sculpture, producing works to be appreciated primarily for their beauty or emotional power." Take note that nothing within that description mentions ability, style, or technique. It's easy to assume that a "good" artist is someone who can take graphite and create a photo realistic drawing. I'm telling you now that this is a false accusation. While yes, artists who can achieve realism are good at what they do, it is not the only art form. If you haven't heard of Picasso, Jackson Pollock, or Gustav Klimt, who are all very famous painters, you wouldn't realize that cubism and abstract style is only a select few forms of art. And even within those forms they are divided up among similar styles. As an artist, you don't have to chose. Many artist don't, and are later on classified within a specific form. Take your time, and don't worry about where you fit in. You're an artist, you don't need to.

    The second thing you need to realize is that art comes in many mediums. For those who don't know, mediums are materials you use to create your artwork. Most mediums are split up into categories of the type of art (e.g. architecture, traditional, electronic, etc.). Below are a list of these categories and their mediums.

    • Traditional
      • Acrylic
      • Chalk
      • Oil Pastel
      • Gouache
      • Ink
      • Sand
      • Watercolor
    • Electronic
      • Graphic Art Software
      • Digital Printing
      • Programming 
    • Photography
      • Film
      • Digital Image Sensor
      • Silver Nitrate
    • Sculpture
      • Glass
      • Clay
      • Bone
      • Marble
      • Plaster
      • Wood
    Of course within these mediums are the bases. Bases are what the mediums are used on. For example, when you draw traditionally, you may use graphite on paper. The paper is the base of the medium. Bases can also be mediums. For example, when a woodworker carves, the wood they use is not only their medium, but their base. As an artist are you forced to choose a medium right away and stick with it for the rest of your career? Of course not! By all means, and I encourage this, dip your foot into each medium to be well-rounded. Learn the basics of everything, in no way will it hurt you or your career! 

    Now you're probably thinking "Why is art so important?" Believe it or not, art is everything. The base to everything is, in fact, art! The house you live in? An architect created blueprints, and the architects who made your house? All artists! The website you were just on, the commercial you just saw, all graphic artists created them. Our history and everything we know is set on the foundations of art. Without the art of the ancient civilizations, we would know nothing. Language is art! The next time you see a poster or even a can label at your local grocery store, you're face-to-face with art. That being said, if you think you're not an artist, newsflash: you are.
    Word Count: 532
     
    Juxtaposed Colors Blog Design by Ipietoon